Engage NY Eureka Math Grade 6 Module 5 Lesson 11 Answer Key
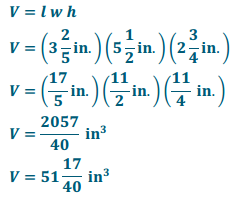
Eureka Math Grade 6 Module 5 Lesson 11 Example Answer Key
Example 1.
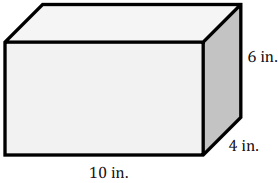
A box with the same dimensions as the prism in the Opening Exercise is used to ship miniature dice whose side lengths have been cut in half. The dice are \(\frac{1}{2}\) in. × \(\frac{1}{2}\) in. × \(\frac{1}{2}\) in. cubes. How many dice of this size can fit in the box?
Answer:
→ How many cubes could we fit across the length? The width? The height?
Two cubes would fit across a 1-inch length. So, I would need to double the lengths to get the number of cubes. Twenty cubes will fit across the 10-inch length, 8 cubes will fit across the 4 -inch width and 12 cubes will fit across the 6-inch height.
→ How can you use this information to determine the number of \(\frac{1}{2}\) in. × \(\frac{1}{2}\) in. × \(\frac{1}{2}\) in. cubes it takes to fill the box?
I can multiply the number of cubes in length, width, and height.
20 × 8 × 12 = 1,920, so 1,920 of the smaller cubes will fill the box.
→ How many of these smaller cubes can fit into the 1 in. × 1 in. × 1 in. cube?
Two confits across the length, two across the width, and two for the height. 2 × 2 × 2 = 8. Eight smaller cubes confit in the larger cube.
→ How does the number of cubes in this example compare to the number of cubes that would be needed in the
Opening Exercise?
\(\frac{\text { new }}{\text { old }}=\frac{1,920}{240}=\frac{8}{1}\)
If I fill the same box with cubes that are half the length, I need 8 times as many.
→ How is the volume of the box related to the number of cubes that will fit in it?
The volume of the box is of the number of cubes that will fit in it.
→ What is the volume of 1 cube?
V= \(\frac{1}{2}\) in. × \(\frac{1}{2}\) in. × \(\frac{1}{2}\) in.
→ What is the product of the number of cubes and the volume of the cubes? What does this product represent?
1920 × \(\frac{1}{8}\) = 240
The product represents the volume of the original box.
Example 2.
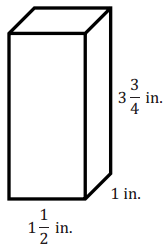
A \(\frac{1}{5}\) in. cube is used to fill the prism. How many in. cubes does it take to fill the prism? What is the volume of the prism? How is the number of cubes related to the volume?
Answer:
→ How would you determine, or find, the number of cubes that fill the prism?
One method would be to determine the number of cubes that will fit across the length, width, and height. Then, I would multiply. 6 will fit across the length, 4 across the width, and 15 across the height. 6 × 4 × 15 = 360, so 360 cubes will fill the prism.
→ How is the number of cubes and the volume related?
The volume is equal to the number of cubes times the volume of one cube.
The volume of one cube is \(\frac{1}{4}\) in. × \(\frac{1}{4}\) in. × \(\frac{1}{4}\) in. = \(\frac{1}{64}\) in3.
360 cubes × \(\frac{1}{64}\) in3 = \(\frac{360}{64}\) in3 = \(\frac{540}{64}\) in3 =5 \(\frac{5}{8}\)in3
→ What other method can be used to determine the volume?
V = l w h
V = (1 \(\frac{1}{2}\) in.) (1 in.) (3 \(\frac{3}{4}\) in.)
V = \(\frac{3}{2}\) in. × \(\frac{1}{1}\) in. × \(\frac{15}{4}\) in.
V = \(\frac{45}{8}\) in3 = 5 \(\frac{5}{8}\) in3
→ Would any other size cubes fit perfectly inside the prism with no space left over?
We would not be able to use cubes with side lengths of \(\frac{1}{2}\) in., \(\frac{1}{3}\) in., or \(\frac{2}{3}\) in. because there would be spaces left over. However, we could use a cube with a side length of \(\frac{1}{8}\) in. without having spaces left over.
Eureka Math Grade 6 Module 5 Lesson 11 Exercise Answer Key
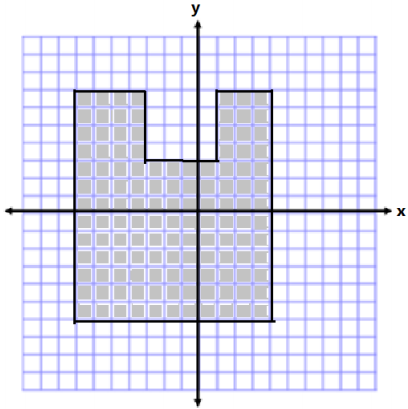
Opening Exercise:
Exercise 1.
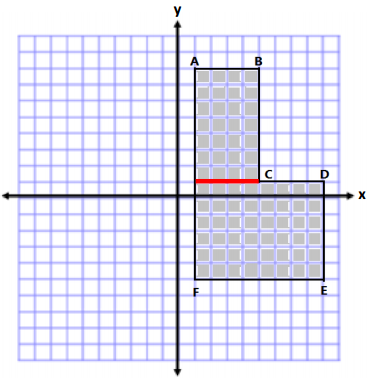
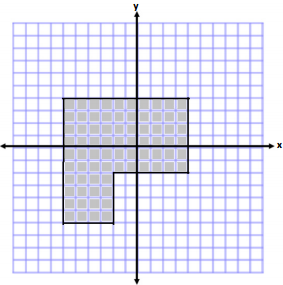
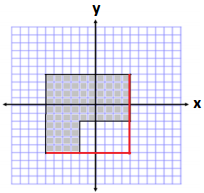
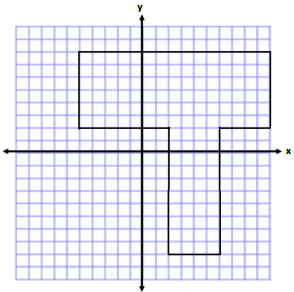
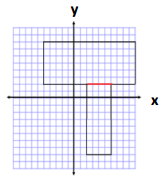
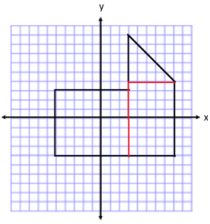
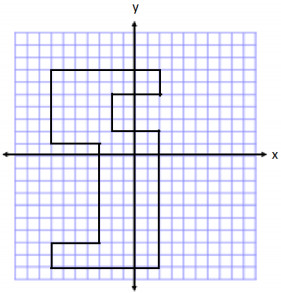
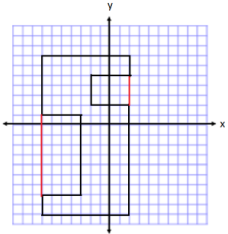
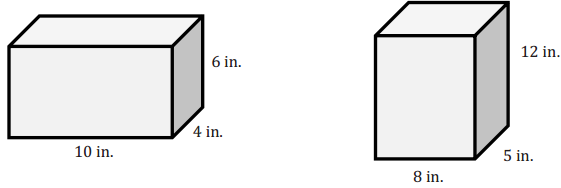
Which prism holds more 1 in. × 1 in. × 1 in. cubes? How many more cubes does the prism hold?
Answer:
Students discuss their solutions with a partner.
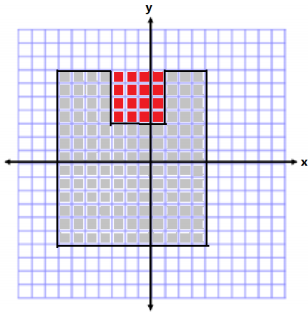
→ How many 1 in. × 1 in. × 1 in. cubes can fit across the bottom of the first rectangular prism?
Answer:
40 cubes can fit across the bottom.
→ How did you determine this number?
Answer:
Answers will vary. I determined how many cubes could fill the bottom layer of the prism and then decided how many layers were needed.
Students who are English language learners may need a model of what “layers” means in this context.
→ How many layers of 1 in. × 1 in. × 1 in. cubes can fit inside the rectangular prism?
There are 6 inches in the height; therefore, 6 layers of cubes can fit inside.
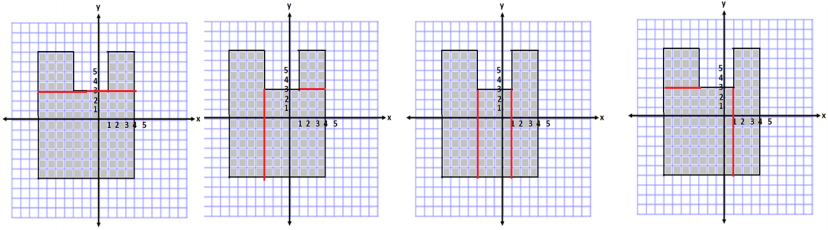
→ How many 1 in. × 1 in. × 1 in. cubes can fit across the bottom of the second rectangular prism?
40 cubes can fit across the bottom.
→ How many layers do you need?
I need 12 layers because the prism is 12 in. tall.
→ Which rectangular prism can hold more cubes?
The second rectangular prism can holds more cubes.
→ How did you determine this?
Both rectangular prisms hold the same number of cubes in one layer, but the second rectangular prism has more layers.
→ How many more layers does the second rectangular prism hold?
It holds 6 more layers.
→ How many more cubes does the second rectangular prism hold?
The second rectangular prism has 6 more layers than the first, with 40 cubes in each layer.
6 × 40 = 240, so the second rectangular prism holds 240 more cubes than the first.
> What other ways can you determine the volume of a rectangular prism?
We can also use the formula V = l. w . h.
Exercises:
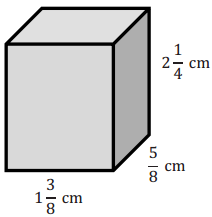
Exercise 1.
Use the prism to answer the following questions.
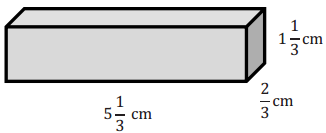
a. Calculate the volume.
Answer:
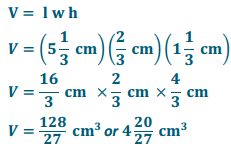
b. If you have to fill the prism with cubes whose side lengths are less than 1 cm, what size would be best?
Answer:
The best choice would be a cube with side lengths of \(\frac{1}{3}\) cm.
c. How many of the cubes would fit in the prism?
Answer:
16 × 2 × 4 = 128, so 128 cubes will fit in the prism.
d. Use the relationship between the number of cubes and the volume to prove that your volume calculation Is correct.
Answer:
The volume of one cube would be \(\frac{1}{3}\) cm × \(\frac{1}{3}\)cm × \(\frac{1}{3}\) cm = \(\frac{1}{27}\) cm3
Since there are 128 cubes, the volume would be 128 × \(\frac{1}{27}\) cm3 = \(\frac{128}{27}\) cm3 or 4\(\frac{20}{27}\) cm3.
Exercise 2.
Calculate the volume of the following rectangular prisms.
a. 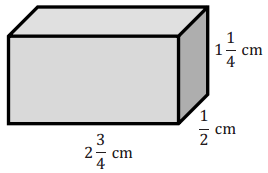
Answer:

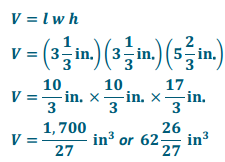
b. 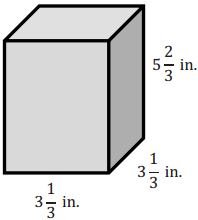
Answer:
Exercise 3.
A toy company is packaging its toys to be shipped. Each small toy is placed inside a cube-shaped box with side lengths of \(\frac{1}{2}\) in. These smaller boxes are then placed into a larger box with dimensions of 12 in. × 4\(\frac{1}{2}\) in. × 3\(\frac{1}{2}\) in.
a. What is the greatest number of small toy boxes that can be packed into the larger box for shipping?
Answer:
24 × 9 × 7 = 1,512, so 1,512 toys can be packed into the larger box.
b. Use the number of small toy boxes that can be shipped in the larger box to help determine the volume of the shipping box.
Answer:
One small box would have a volume of \(\frac{1}{2}\) in. × \(\frac{1}{2}\) in. × \(\frac{1}{2}\) in. = \(\frac{1}{8}\) in3.
Now, I multiply the number of cubes by the volume of the cube.
1,512 × \(\frac{1}{8}\) in3 = \(\frac{1512}{8}\) in3 = 189 in3
Exercise 4.
A rectangular prism with a volume of 8 cubic units is filled with cubes twice: once with cubes with side lengths of \(\frac{1}{2}\) unit and once with cubes with side lengths of \(\frac{1}{3}\) unit.
a. How many more of the cubes with \(\frac{1}{3}\) unit side lengths than cubes with \(\frac{1}{2}\) unit side lengths are needed to fill the prism?
Answer:
There are 8 cubes with \(\frac{1}{2}\) unit side lengths in 1 cubic unit because the volume of one cube is \(\frac{1}{8}\) cubic unit. Since we have 8 cubic units, we would have 64 total cubes with \(\frac{1}{2}\) unit side lengths because 8 × 8 = 64.
There are 27 cubes with \(\frac{1}{3}\) unit side lengths in 1 cubic unit because the volume of one cube is \(\frac{1}{27}\) cubic units. Since we have 8 cubic units, we would have 216 total cubes with \(\frac{1}{3}\) unit side lengths because 8 × 27 = 216. 216 – 64 = 152, so 152 more cubes with \(\frac{1}{3}\) unit side lengths are needed to fill the prism.
b. Why does it take more cubes with \(\frac{1}{3}\) unit side lengths to fill the prism than it does with cubes with \(\frac{1}{2}\) unit side lengths?
Answer:
\(\frac{1}{3}\) < \(\frac{1}{2}\). The side length is shorter for the cube with a \(\frac{1}{3}\) unit side length, so it takes more to fill the rectangular prism.
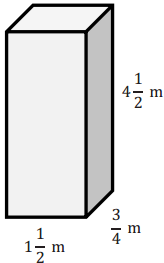
Exercise 5.
Calculate the volume of the rectangular prism. Show two different methods for determining the volume.
Answer:
Method 1:
Method 2:
Fill the rectangular prism with cubes that are \(\frac{1}{4}\) m × \(\frac{1}{4}\) m × \(\frac{1}{4}\) m.
The volume of each cube is \(\frac{1}{64}\) m3.
We would have 6 cubes across the length, 3 cubes across the width, and 18 cubes across the height.
6 × 3 × 18 = 324, so the rectangular prism could be filled with 324 cubes with \(\frac{1}{4}\) m side lengths.
324 × \(\frac{1}{64}\) m3 = 5 \(\frac{1}{16}\) m3.
Eureka Math Grade 6 Module 5 Lesson 11 Problem Set Answer Key
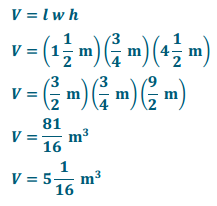
Question 1.
Answer the following questions using this rectangular prism:
a. What is the volume of the prism?
Answer:
V = l w h
V = (9 in.) (1 \(\frac{1}{3}\) in.) (4 \(\frac{2}{3}\)in.)
V = ( \(\frac{9}{1}\) in.) (\(\frac{4}{3}\) in.) (\(\frac{14}{3}\) in.)
V = \(\frac{504}{9}\) in3
V = 56 in3.
b. Linda fills the rectangular prism with cubes that have side lengths of \(\frac{1}{3}\) in. How many cubes does she need to fill the rectangular prism?
Answer:
She needs 27 across by 4 wide and 14 high.
Number of cubes = 27 × 4 × 14 = 1,512.
Linda needs 512 cubes with \(\frac{1}{3}\) in. side lengths to fill the rectangular prism.
c. How is the number of cubes related to the volume?
Answer:
56 × 27 = 1,512
The number of cubes needed is 27 times larger than the volume.
d. Why is the number of cubes needed different from the volume?
Answer:
Because the cubes are not each 1 in., the volume is different from the number of cubes. However, I could multiply the number of cubes by the volume of one cube and still get the original volume.
e. Should Linda try to fill this rectangular prism with cubes that are \(\frac{1}{2}\) in. long on each side? Why or why not?
Answer:
Because some of the lengths are \(\frac{1}{3}\) in. and some are \(\frac{2}{3}\) in., it would not be possible to use side lengths of \(\frac{1}{2}\) in. to fill the prism.
Question 2.
Calculate the volume of the following prisms.
a. 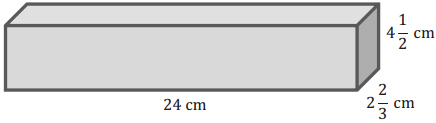
Answer:
V = l w h
V = (24 cm) (2\(\frac{2}{3}\) cm) (4\(\frac{1}{2}\) cm)
V = (24cm) (\(\frac{8}{3}\) cm) (\(\frac{9}{2}\) cm)
V = \(\frac{1728}{6}\) cm3
V = 288 cm3
b. 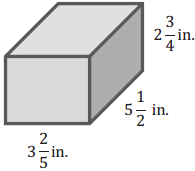
Answer:
Question 3.
A rectangular prism with a volume of 12 cubic units is filled with cubes twice: once with cubes with \(\frac{1}{2}\) unit side lengths and once with cubes with \(\frac{1}{3}\)-unit side lengths.
a. How many more of the cubes with \(\frac{1}{3}\)-unit side lengths than cubes with \(\frac{1}{2}\)-unit side lengths are needed to fill the prism?
Answer:
There are 8 cubes with \(\frac{1}{2}\)-unit side lengths in 1 cubic unit because the volume of one cube is \(\frac{1}{8}\) cubic unit. Since we have 12 cubic units, we would have 96 total cubes with \(\frac{1}{2}\)-unit side lengths because 12 × 8 = 96.
There are 27 cubes with \(\frac{1}{3}\)-unit side lengths in 1 cubic unit because the volume of one cube is \(\frac{1}{27}\) cubic unit. Since we have 12 cubic units, we would have 324 total cubes with \(\frac{1}{3}\)-unit side lengths because 12 × 27 = 324.
324 – 96 = 228, so there are 228 more cubes with \(\frac{1}{3}\)-unit side lengths needed than there are cubes with \(\frac{1}{2}\)-unit side lengths needed.
b. Finally, the prism is filled with cubes whose side lengths are \(\frac{1}{4}\) unit. How many \(\frac{1}{4}\) unit cubes would it take to fill the prism?
Answer:
There are 64 cubes with \(\frac{1}{4}\)-unit side lengths in 1 cubic unit because the volume of one cube is \(\frac{1}{64}\) cubic unit.
Since there are 12 cubic units, we would have 768 total cubes with side lengths of \(\frac{1}{4}\) unit because 12 × 64 = 768.
Question 4.
A toy company is packaging its toys to be shipped. Each toy is placed inside a cube-shaped box with side lengths of 3\(\frac{1}{2}\) in. These smaller boxes are then packed into a larger box with dimensions of 14 in. × 7 in. × 3\(\frac{1}{2}\) in.
a. What is the greatest number of toy boxes that can be packed into the larger box for shipping?
Answer:
4 × 2 × 1 = 8, so 8 toy boxes can be packed into the larger box for shipping.
b. Use the number of toy boxes that can be shipped in the large box to determine the volume of the shipping box.
Answer:
One small box would haveavolume of 3\(\frac{1}{2}\) in. × 3\(\frac{1}{2}\) in. × 3\(\frac{1}{2}\) in. = 42\(\frac{7}{8}\) in3.
Now, I will multiply the number of cubes by the volume of the cube. 8 × 42\(\frac{7}{8}\) in3 = 343 in3
Question 5.
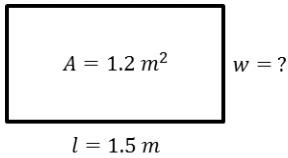
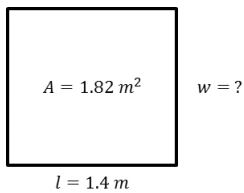
A rectangular prism has a volume of 34.224 cubic meters. The height of the box is 3. 1 meters, and the length is 2.4 meters.
a. Write an equation that relates the volume to the length, width, and height. Let w represent the width, in meters.
Ans;
34.224 = (3.1) (2. 4)w
b. Solve the equation.
Answer:
34.224 = 7.44 w
w = 4.6
The width is 4.6 m.
Eureka Math Grade 6 Module 5 Lesson 11 Exit Ticket Answer Key
Question 1.
Calculate the volume of the rectangular prism using two different methods. Label your solutions Method 1 and Method 2.
Answer:
Method 1:
V = l w h
V = (1\(\frac{3}{8}\) cm) (\(\frac{5}{8}\) cm) (2\(\frac{1}{4}\) cm)
V = \(\frac{11}{8}\) cm × \(\frac{5}{8}\) cm × \(\frac{9}{4}\) cm
V = \(\frac{495}{256}\) cm3
Method 2:
Fill shape with \(\frac{1}{8}\) cm cubes.
11 × 5 × 18 = 990, so 990 cubes could be used to fill the prism.
Each cube has a volume of \(\frac{1}{8}\) cm × \(\frac{1}{8}\) cm × \(\frac{1}{8}\) cm = \(\frac{1}{512}\) cm3
V = 990 × \(\frac{1}{512}\) cm3 = \(\frac{990}{512}\) cm3 = \(\frac{495}{256}\) cm3
Eureka Math Grade 6 Module 5 Lesson 11 Multiplication of Fractions II Answer Key
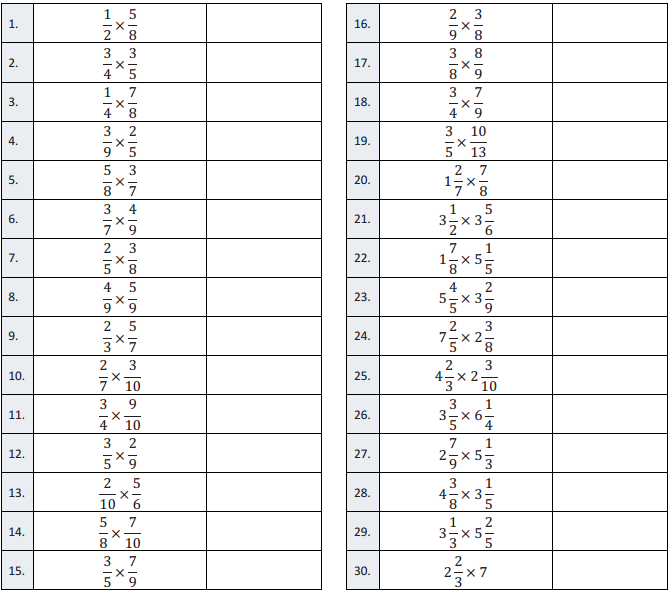
Multiplication of Fractions II – Round 1:
Directions: Determine the product of the fractions and simplify.
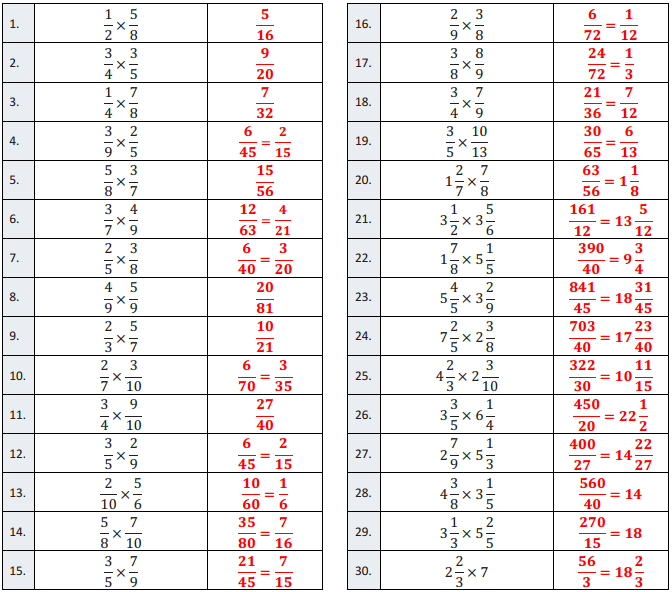
Question 1.
\(\frac{1}{2}\) × \(\frac{5}{8}\)
Answer:
\(\frac{5}{16}\)
Question 2.
\(\frac{3}{4}\) × \(\frac{3}{5}\)
Answer:
\(\frac{9}{20}\)
Question 3.
\(\frac{1}{4}\) × \(\frac{7}{8}\)
Answer:
\(\frac{7}{32}\)
Question 4.
\(\frac{3}{9}\) × \(\frac{2}{5}\)
Answer:
\(\frac{6}{45}\) = \(\frac{2}{15}\)
Question 5.
\(\frac{5}{8}\) × \(\frac{3}{7}\)
Answer:
\(\frac{15}{56}\)
Question 6.
\(\frac{3}{7}\) × \(\frac{4}{9}\)
Answer:
\(\frac{12}{63}\) = \(\frac{4}{21}\)
Question 7.
\(\frac{2}{5}\) × \(\frac{3}{8}\)
Answer:
\(\frac{6}{40}\) = \(\frac{3}{20}\)
Question 8.
\(\frac{4}{9}\) × \(\frac{5}{9}\)
Answer:
\(\frac{20}{81}\)
Question 9.
\(\frac{2}{3}\) × \(\frac{5}{7}\)
Answer:
\(\frac{10}{21}\)
Question 10.
\(\frac{2}{7}\) × \(\frac{3}{10}\)
Answer:
\(\frac{6}{70}\) = \(\frac{3}{35}\)
Question 11.
\(\frac{3}{4}\) × \(\frac{9}{10}\)
Answer:
\(\frac{27}{40}\)
Question 12.
\(\frac{3}{5}\) × \(\frac{2}{9}\)
Answer:
\(\frac{6}{45}\) = \(\frac{2}{15}\)
Question 13.
\(\frac{2}{10}\) × \(\frac{5}{6}\)
Answer:
\(\frac{10}{60}\) = \(\frac{1}{6}\)
Question 14.
\(\frac{5}{8}\) × \(\frac{7}{10}\)
Answer:
\(\frac{35}{80}\) = \(\frac{7}{16}\)
Question 15.
\(\frac{3}{5}\) × \(\frac{7}{9}\)
Answer:
\(\frac{21}{45}\) = \(\frac{7}{15}\)
Question 16.
\(\frac{2}{9}\) × \(\frac{3}{8}\)
Answer:
\(\frac{6}{72}\) = \(\frac{1}{12}\)
Question 17.
\(\frac{3}{8}\) × \(\frac{8}{9}\)
Answer:
\(\frac{24}{72}\) = \(\frac{1}{3}\)
Question 18.
\(\frac{3}{4}\) × \(\frac{7}{9}\)
Answer:
\(\frac{21}{36}\) = \(\frac{7}{12}\)
Question 19.
\(\frac{3}{5}\) × \(\frac{10}{13}\)
Answer:
\(\frac{30}{65}\) = \(\frac{6}{13}\)
Question 20.
1 \(\frac{2}{7}\) × \(\frac{7}{8}\)
Answer:
\(\frac{63}{56}\) = 1 \(\frac{1}{8}\)
Question 21.
3 \(\frac{1}{2}\) × 3 \(\frac{5}{6}\)
Answer:
\(\frac{161}{12}\) = 13 \(\frac{5}{12}\)
Question 22.
\(\frac{1}{4}\) × \(\frac{1}{4}\)
Answer:
\(\frac{1}{4}\)
Question 23.
1 \(\frac{7}{8}\) × 5 \(\frac{1}{5}\)
Answer:
\(\frac{390}{40}\) = 9 \(\frac{3}{4}\)
Question 24.
7 \(\frac{2}{5}\) × 2 \(\frac{3}{8}\)
Answer:
\(\frac{703}{40}\) = 17 \(\frac{23}{40}\)
Question 25.
4 \(\frac{2}{3}\) × 2 \(\frac{3}{10}\)
Answer:
\(\frac{322}{30}\) = 10 \(\frac{11}{15}\)
Question 26.
3 \(\frac{3}{5}\) × 6 \(\frac{1}{4}\)
Answer:
\(\frac{450}{20}\) = 22 \(\frac{1}{2}\)
Question 27.
2 \(\frac{7}{9}\) × 5 \(\frac{1}{3}\)
Answer:
\(\frac{400}{27}\) = 14 \(\frac{22}{27}\)
Question 28.
4 \(\frac{3}{8}\) × 3 \(\frac{1}{5}\)
Answer:
\(\frac{560}{40}\) = 4
Question 29.
3 \(\frac{1}{3}\) × 5 \(\frac{2}{5}\)
Answer:
\(\frac{270}{15}\) = 18 \(\frac{2}{3}\)
Question 30.
2 \(\frac{2}{3}\) × 7
Answer:
\(\frac{56}{3}\) = 18 \(\frac{2}{3}\)
Multiplication of Fractions II – Round 2:
Directions: Determine the product of the fractions and simplify.
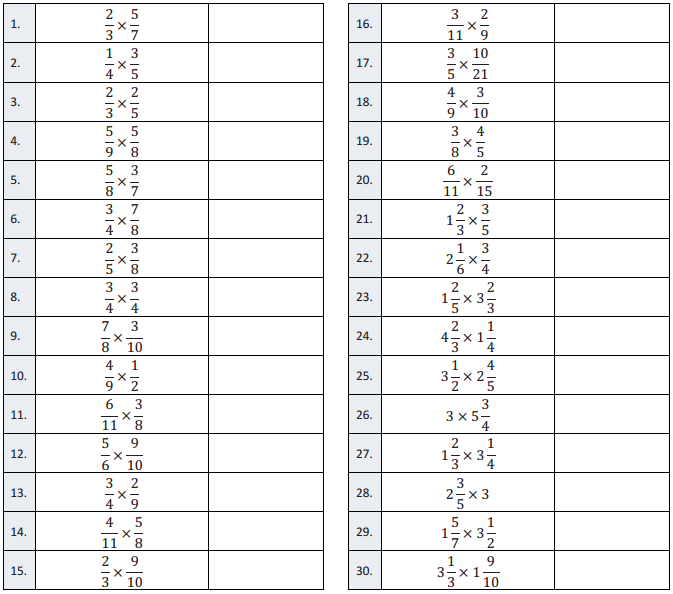
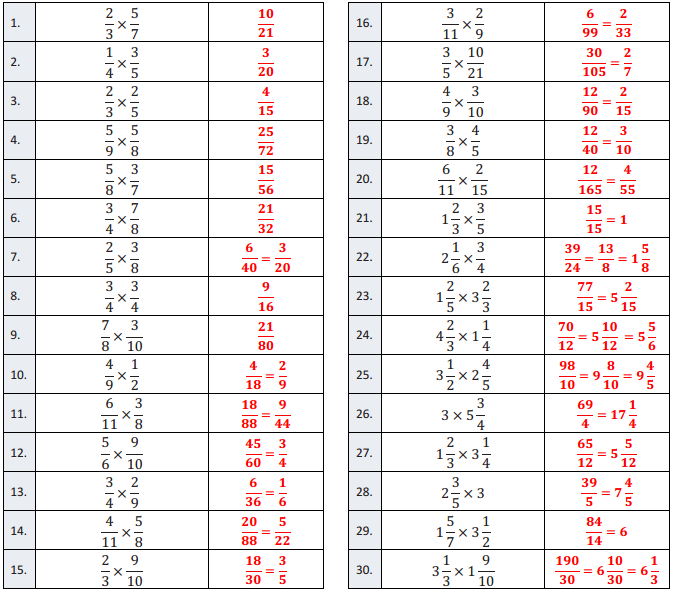
Question 1.
\(\frac{2}{3}\) × \(\frac{5}{7}\)
Answer:
\(\frac{10}{21}\)
Question 2.
\(\frac{1}{4}\) × \(\frac{3}{5}\)
Answer:
\(\frac{3}{20}\)
Question 3.
\(\frac{2}{3}\) × \(\frac{2}{5}\)
Answer:
\(\frac{4}{15}\)
Question 4.
\(\frac{5}{9}\) × \(\frac{5}{8}\)
Answer:
\(\frac{25}{72}\)
Question 5.
\(\frac{5}{8}\) × \(\frac{3}{7}\)
Answer:
\(\frac{15}{56}\)
Question 6.
\(\frac{3}{4}\) × \(\frac{7}{8}\)
Answer:
\(\frac{21}{32}\)
Question 7.
\(\frac{2}{5}\) × \(\frac{3}{8}\)
Answer:
\(\frac{6}{40}\) = \(\frac{3}{20}\)
Question 8.
\(\frac{3}{4}\) × \(\frac{3}{4}\)
Answer:
\(\frac{9}{16}\)
Question 9.
\(\frac{7}{8}\) × \(\frac{3}{10}\)
Answer:
\(\frac{21}{80}\)
Question 10.
\(\frac{4}{9}\) × \(\frac{1}{2}\)
Answer:
\(\frac{4}{18}\) = \(\frac{2}{9}\)
Question 11.
\(\frac{6}{11}\) × \(\frac{3}{8}\)
Answer:
\(\frac{18}{88}\) = \(\frac{9}{44}\)
Question 12.
\(\frac{5}{6}\) × \(\frac{9}{10}\)
Answer:
\(\frac{45}{60}\) = \(\frac{3}{4}\)
Question 13.
\(\frac{3}{4}\) × \(\frac{2}{9}\)
Answer:
\(\frac{6}{36}\) = \(\frac{1}{6}\)
Question 14.
\(\frac{4}{11}\) × \(\frac{5}{8}\)
Answer:
\(\frac{20}{88}\) = \(\frac{5}{22}\)
Question 15.
\(\frac{2}{3}\) × \(\frac{9}{10}\)
Answer:
\(\frac{18}{30}\) = \(\frac{3}{5}\)
Question 16.
\(\frac{3}{11}\) × \(\frac{2}{9}\)
Answer:
\(\frac{6}{99}\) = \(\frac{2}{33}\)
Question 17.
\(\frac{3}{5}\) × \(\frac{10}{21}\)
Answer:
\(\frac{30}{105}\) = \(\frac{2}{7}\)
Question 18.
\(\frac{4}{9}\) × \(\frac{3}{10}\)
Answer:
\(\frac{12}{90}\) = \(\frac{2}{15}\)
Question 19.
\(\frac{3}{8}\) × \(\frac{4}{5}\)
Answer:
\(\frac{12}{40}\) = \(\frac{3}{10}\)
Question 20.
\(\frac{6}{11}\) × \(\frac{2}{15}\)
Answer:
\(\frac{12}{165}\) = \(\frac{4}{55}\)
Question 21.
1 \(\frac{2}{3}\) × \(\frac{3}{5}\)
Answer:
\(\frac{15}{15}\) = 1
Question 22.
2 \(\frac{1}{6}\) × \(\frac{3}{4}\)
Answer:
\(\frac{39}{24}\) = \(\frac{13}{8}\) = 1 \(\frac{5}{8}\)
Question 23.
1 \(\frac{2}{5}\) × 3 \(\frac{2}{3}\)
Answer:
\(\frac{77}{15}\) = 5 \(\frac{2}{15}\)
Question 24.
4 \(\frac{2}{3}\) × 1 \(\frac{1}{4}\)
Answer:
\(\frac{70}{12}\) = 5 \(\frac{10}{12}\) = 5 \(\frac{5}{6}\)
Question 25.
3 \(\frac{1}{2}\) × 2 \(\frac{4}{5}\)
Answer:
\(\frac{98}{10}\) = 9 \(\frac{8}{10}\) = 9 \(\frac{4}{5}\)
Question 26.
3 × 5 \(\frac{3}{4}\)
Answer:
\(\frac{69}{4}\) = 17 \(\frac{1}{4}\)
Question 27.
1 \(\frac{2}{3}\) × 3 \(\frac{1}{4}\)
Answer:
\(\frac{65}{12}\) = 5 \(\frac{5}{12}\)
Question 28.
2 \(\frac{3}{5}\) × 3
Answer:
\(\frac{39}{5}\) = 7 \(\frac{4}{5}\)
Question 29.
1 \(\frac{5}{7}\) × 3 \(\frac{1}{2}\)
Answer:
\(\frac{84}{14}\) = 6
Question 30.
3 \(\frac{1}{3}\) × 1 \(\frac{9}{10}\)
Answer:
\(\frac{190}{30}\) = 6 \(\frac{10}{30}\) = 6 \(\frac{1}{3}\)